IMPORTANT SAFETY INFORMATION
-
Read all instructions before using tool!
-
Always wear eye Protection!
-
Wear Proper Clothing
-
Leather gloves to protect hands & fingers
-
Long-sleeves to protect from flying debris
-
-
Keep hands and fingers out of tool when operating!
WORK PIECE SETUP & PREPARATIONS
-
Key to your success is the proper setup & planning the project.
-
The work station should be at a height that is comfortable to operate the tool.
-
When templating, cutting or preparing the counter top, make sure to oversize the work-piece by the amount to be chiseled off. We have found ½” bite to work well with granites.
-
However, softer travertine’s & Limestone’s chisel better when taking ¾” bite off, this helps eliminate crumbling the corners off of the softer stones. A small test piece can be used to determine the optimal “BITE DEPTH” to be taken off the face of your finished product.
-
(On laminated granite edges we like to use 2″ laminations, leaving 1 ½” after its chiseled, this helps avoid damage to the laminations that might occur if narrower lamination strips are used.)
-
-
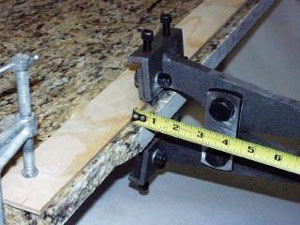
Use C-clamps to secure thin plywood (¼” works well) straight edges to the top and bottom of the work piece, (see photo below) and set back from the edge of the stone ½” to 3/4″ depending on what you have determined to be the optimal “BITE DEPTH” for your particular stone. This straight edge provides a guide for the tool blades to follow, allowing you to produce a more accurate and straighter looking edge.
-
Also by placing the tool against guides clamped on both top and bottom of the stone, it is easier to feel when you are lined up to bite an even amount off of the top and bottom of the stone, this is particularly helpful when chiseling 4cm (1 ½) worth of laminated material.
TIP:
The use of this strait edge, particularly on the top surface is helpful in preventing the blade bolts from striking the stone possibly adding unwanted chips.
ADJUSTING BLADES
-
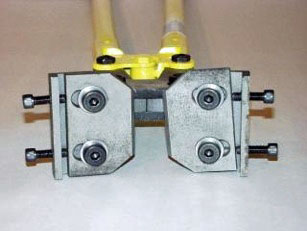
Slightly loosen the four main bolts that attach the blades to the tool, this allows the blade to be repositioned for different stone thickness.
-
With the handles of the tool at their fully closed position, use the four set screws to adjust the gap “jaw-opening” between the blades. ALWAYS set the blades so that they are parallel, and ALWAYS adjust blades on both sides of the tool equal amounts, so that one blade does not over or under-bite the other.
-
Begin by setting the blade opening to a measurement that is 1/8″ SMALLER than the total thickness of the stone that you are working.
-
Re-tighten the nuts & bolts that secure the blades to the tool. (Note: washer must always be use on top of blade installation or blades cannot be tightened properly!)
-
If these are not tightened, the tool will not hold its adjustment, and damage to the set-screws will likely occur!
-
These set screws are for blade positioning only! Do not rely on them to maintain the blade securely.
-
Operation of the tool is easier and more efficient for the operator when the blade opening is set properly. For example, a tool whose jaws are set to a measurement too close to the stone thickness, will not develop the energy to bite off the face of the stone.
-
The opposite is also true, if a tools jaw opening is set significantly smaller than the stone thickness, the operator will likely not have the strength to close the tool, or damage to the work-piece may occur due to over exertion on the part of the operator as he attempts to close an improperly adjusted tool.
-
Begin with the 1/8″ rule stated above and then, if proper splitting of the stone does not occur, make slight inward adjustments of the blades until optimal performance is achieved.
CHISELING & TECHNIQUE
-
Once again a comfortable workstation height will make this tool easier to use.
-
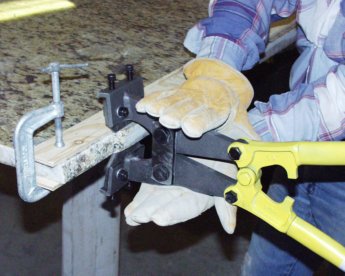
Using an assistant (spotter) to help align the blades and move the tool along will speed up the work and eliminate the need for the operator to catch the weight of the tool after each bite.
-
Caution – Heavy gloves must be worn by the spotter as he holds the tool in open-handed fashion (see photo below) and long sleeves are recommended to protect from flying debris.
-
-
Begin by chiseling from one end of your work piece to the other, rather than randomly starting in the middle.
-
Overlapping each “BITE” by even ¼” and lining up blades with the previous bite will improve the straightness and finish look of your product.
-
Bring the tools chisels to bear on the material, then bring the handles of the tool together in a swift & solid motion, splitting or snapping the face off. Closing the tool in a slow, gradual manner may not achieve desired results.
-
Caution – Best results will be achieved when bringing the handles together evenly like squeezing pliers rather than applying too much downward motion at the end of the tool possibly putting damaging strain on the work piece.
-
-
Curves and irregular shapes are easily free-handed by following a line drawn on the stone at a consistent bite distance from the front edge.
FINISHING & FINE TUNING
-
Cleanup of inside corners and other variations in the edge can be fine tuned using as set of small hand chisels and a hammer.
-
Sanding or polishing a slight radius on the top & bottom corners of your project will give you a finish product that is free of the sharp edges produced when chiseling the edge.
-
Many edges will look better when the chiseled face of the stone is enhanced with an applied clear coat to restore a color similar to the polished face of the stone.
-
Always – test sample any clear coat spray or otherwise for its effects on your particular stone.

IMPORTANT TIPS
-
Butt jointed seams – Are best accomplished by stopping the chiseling process a few inches from the seam. Then upon installation solidly epoxy the seam where the edges join leaving no voids near the front edge. Then use the Rockbiter tool to chisel and finish this area on site.
-
Sink areas – Always chisel your project before sink holes are cut. If not you will risk damage or breakage at that area due to the forces applied to the stone during chiseling.